Lab 1
- Introduction
- Getting started
- Materials
- Controls
- Obstacles
- Checkpoints
- A User Interface
- Better Art Assets (optional)
- Landscape (optional)
- Further Information
- Some Frequent Pitfalls
Introduction
In this lab you will develop a very basic 3D hovercraft racing game using Unity and its built-in physics engine. You should start by opening Unity and familiarizing yourself with the UI. In Unity, each game is a project, consisting of multiple levels, or scenes. Each scene, in turn, contains various game objects which are arranged in a hierarchy. Game objects, finally, can contain various components, each of which is responsible for different aspects of the game. The most important components are the transform, which defines the position and rotation of the game object in the scene, renderers, which define if and how a game object is shown in the game, collider and rigidbody, which define the physical properties of an object, including if and how it reacts to collisions, and - perhaps most importantly - scripts, which are used to implement arbitrary behavior. For a reasonably complex game, Unity could look like this:
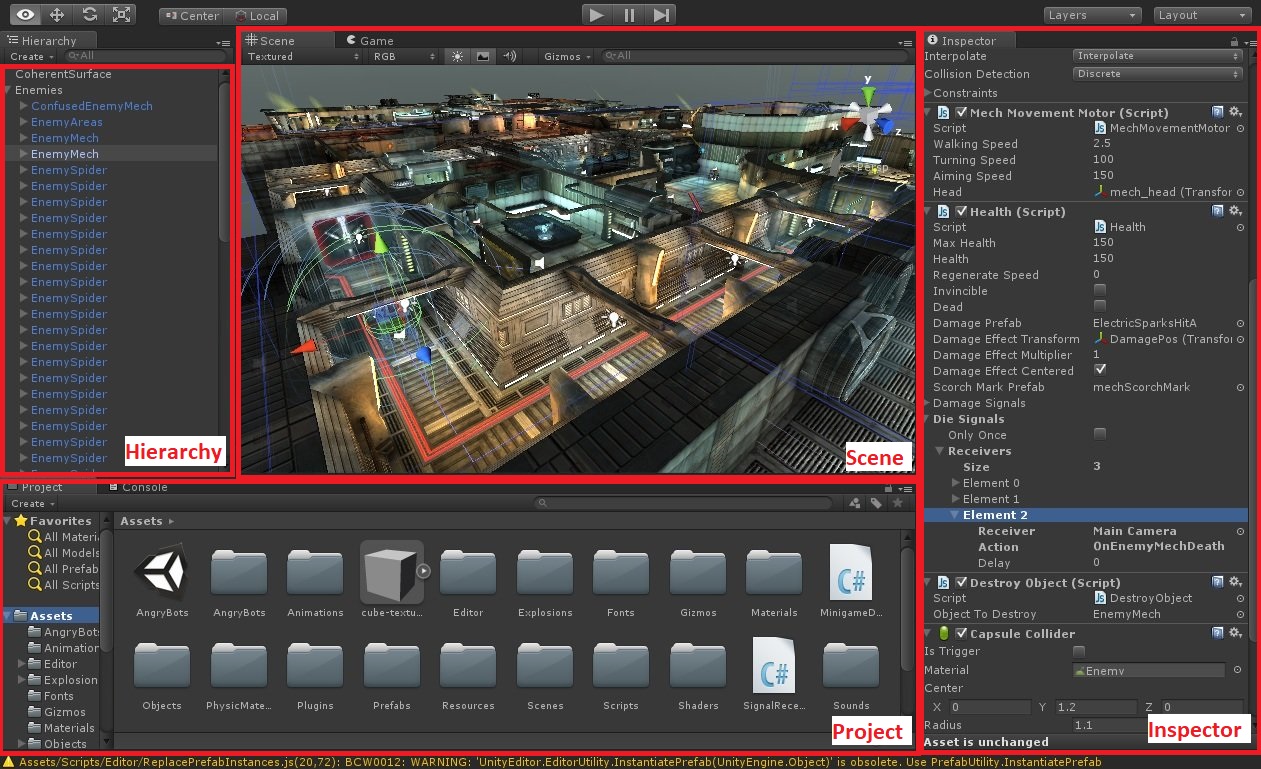
In the center of the screen, you can see a 3D preview of the current scene. You can navigate this view with the mouse. Hold the right mouse button to rotate the view, the center mouse button to move it around (pan), and the mouse wheel to zoom. To the left of the scene view you can see the game object hierarchy. When you add game objects to a scene, they will show up here. By grouping game objects together you can not only organize the scene nicely, it also causes the game objects to move together.
To the right of the scene view you can find the inspector, which shows you all components for the game object that is currently selected in the hierarchy. You can use the inspector to change attributes of components, but also to add, remove, or temporarily activate/deactivate components.
Finally, at the bottom of the screen, you can see the folders and files that make up your project. This is where you will place art assets, like 3D models or 2D images, that can then be used in any scene in your project.
Below you will find a step-by-step description for creating a simple racing game, inspired by “Hoverrace” as shown in class. Note that instructions start out with a lot of detailed, often providing the entire source code that is required. Read and try to understand the code, because as the tutorial progresses you will be given less and less detail, and are expected to figure things out on your own.
Getting started
Start by opening Unity and creating a new, empty project. When Unity asks you for the type of project, select “3D”. After some initialization time, Unity should show you a scene with only two game objects in the hierarchy: The Main Camera, and a Directional Light. Using the menu “Game Object”, “3D” add a “Plane” game object to the scene. When you do so, you can see the scene view update with the new plane, and the plane will also be automatically selected in the hierarchy. By default, the plane is 1 by 1 units large, but we will use it as the (temporary) surface on which to drive, and therefore want to increase its size. In the inspector on the right, you can see the position, rotation and scale of the plane. Change its size to 100 by 100 units, by setting the x- and z-scale to 100 each (the y scale is the height, and since the plane has no actual height, changing the y-scale won’t change anything). Make sure the position coordinates of the plane are 0, 0, 0 and then familiarize yourself with the scene view by looking at the plane from multiple angles. Next, add a 3D “Cube” game object to the scene, and set its size to 5 by 1.5 by 3. This cube will represent the vehicle the player can drive around with. You may have noticed that the new cube appeared in the center of the screen, which, depending on the camera angle and zoom, may be behind the plane. You can use the inspector to change the coordinates, or you can use the “move”-tool (second button in the toolbar on the top left, hotkey W) to move the cube around the scene. Make sure the cube is above the plane, with a y-coordinate of around 1.5 (it will float over the plane, we will ensure that the “hovercraft” actually drives on the surface later). The x- and z-coordinates define where the cube is on the plane, and should be set to about x=-11, z=27. Above the scene view you can find a “play” button that allows you to test the current state of the game. You should now be able to vaguely see the box when you start the game. Because this view is not ideal for game play purposes, we will now change the camera position. Select the Main Camera in the hierarchy, and change its y-position to 12, and its x-rotation value to 25 degrees. When you start the game now, you should see the cube from diagonally above. In the next step we will give the game objects some color, since having a white box on white background is still a bit hard to see, and definitely not fun to play with.
Materials
To give our plane and cube some color, we need to add a material. In the project view on the bottom of the screen, right-click and choose Create - Folder to create a folder called “Materials”. It is good practice to keep your project directory orderly, so that you are still able to find everything as your project grows. We will now create two materials with different colors, one for the floor/plane and one for the hovercraft/cube. Open the newly created folder, and again right-click and choose Create - Material. Give your new material a suitable name, such as vehiclematerial. When you select a material, you can see its properties in the inspector. Each material consists of different maps that control different aspects of its appearance, such as a metallic look, the appearance of bumps, or other details. For now, we only care about the Albedo map, which controls the diffuse reflection of light, i.e. what you would consider the (visual) “texture” of the material. In more advanced usage, you can select an image to appear on the object the material is applied to, but for now, we will only select a color using the color picker option to the right of the albedo map in the inspector. Choose a suitable color for your hovercraft (I picked red). You can now assign this material to the hovercraft/cube by dragging it from the project view onto the cube in the scene preview. Alternatively, you can select the cube in the hierarchy, and then modify the Materials property of its MeshRenderer in the inspector, by replacing Element 0 with the newly created material.
Now create another material, using a different color (I used green), and assign it to the plane. When you run the game now, you should be able to actually see the hovercraft well against the background, like this:
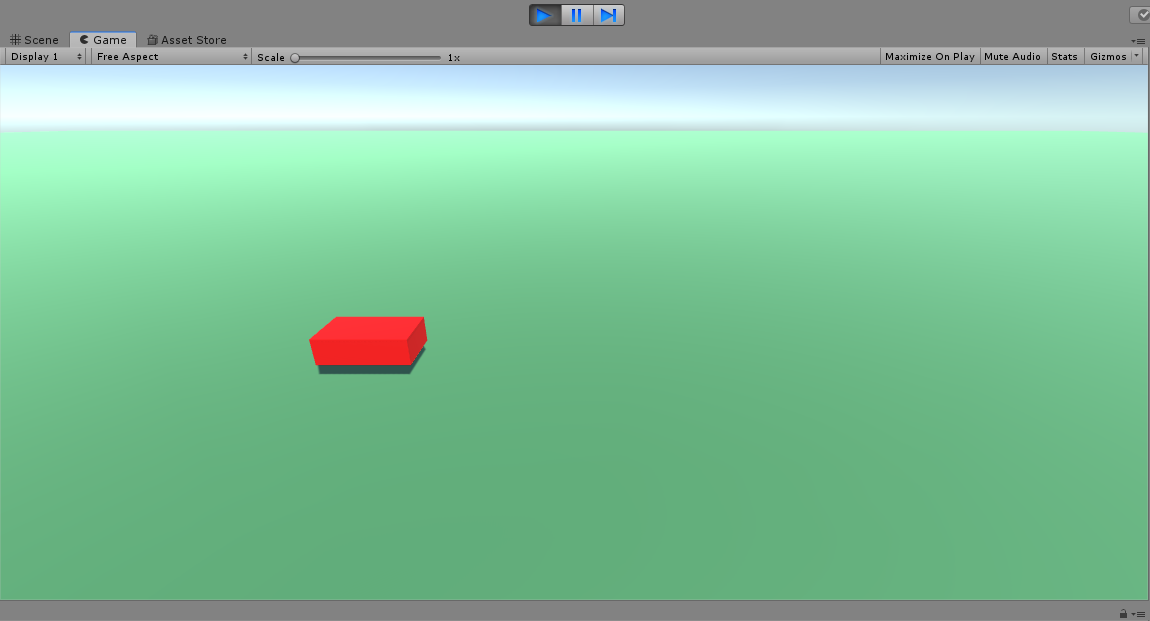
So far our game is pretty boring, since the player can’t actually do anything yet. In the next step we will add the ability for players to actually move the hovercraft.
Controls
Before we implement how the player actually interacts with the game, we need to briefly discuss physics. In our game, in order to move the hovercraft, we will apply a force to it, which in turn will make the hovercraft move. This has the advantage that the behavior of the movement will be controlled by the built-in physics engine, allowing us to put arbitrary obstacles that the hovercraft can collide with. The physics system in Unity consists of many components and gives the programmer a lot of freedom of which aspects of movement should be controlled by the engine, and which ones the programmer wants to handle themself. The two most important concepts are that of a collider, and that of a rigidbody, both of which are components that can be added to game objects. If you select your cube in the hierarchy, you will see that it already has a Box Collider component, which allows it to, as the name implies, collide with other game objects. However, in order to actually apply forces, and define the physical properties of a game object, the Rigidbody component is needed. With the cube selected, click “Add Component” in the inspector, and select the Rigidbody component from the Physics menu (you can also use the search bar to filter the list). If you start your game now, you will see that your cube is affected by gravity, and will fall to the surface of the plane. Now we have everything we need to actually make the hovercraft move!
Add another component to your hovercraft using the “Add Component” button, and select “New Script” from the bottom of the list. Give your script a reasonable name, such as VehicleController. You can then open the script in Visual Studio by double clicking on its name in the inspector, or selecting the script file from the project directory. A large part of your project will consist of creating and implementing these scripts. Generally speaking, scripts in Unity control the behavior of the game object they are attached to, and/or let it communicate with other game objects. Unlike the linear style of programming you might be more used to, each of these scripts runs all the time. More precisely, every time a new frame is rendered on the screen, each script of each game object executes its Update method, and we will use these Update methods to control the behavior of the game object. For the hovercraft, for example, we want to apply a force when the user presses the forward button. To do this, we will add code to the VehicleController’s Update method that checks if the forward button is pressed, and applies a forward-facing force to the hovercraft in that case. By default, Unity allows players to customize the controls of each game, and instead of asking if a particular key on the keyboard is pressed, we will query if a particular (abstract) Button or Axis is active (the term Axis refers to the fact that players can also use joysticks and gamepads to control the game. Unity supports this automatically out of the box). For now, we will look at the axis called “Vertical”, which refers to the forward and backward directions. The class Input provides a static method GetAxis which allows you to query the status of that axis. It will return a value less than 0 if the back button (default: S or cursor down) is pressed, a value greater than 0 if the forward button (default: W or cursor up) is pressed, or 0 if neither are pressed (with a joystick, it may actually return a range of values that depends on how far the joystick is pushed forward/backward, but we will not need that for now).
Once we have detected that the player wants to move forward, we need to apply a force to the hovercraft, using the Rigidbody component. As you can see, the VehicleController script is derived from MonoBehaviour, which is necessary for the script to be able to be used as a component of a game object. MonoBehaviour, in turn, provides several member variables and methods to refer to the game object the script is attached to. For example, you have access to gameObject, which allows you to query the name, and other information, of the game object the script is attached to. You also have a method called GetComponent, which allows you to get other components that are attached
to the same game object, such as the rigidbody. We will use GetComponent to get the Rigidbody component, which has methods to apply a force to the game object.
Add the following code to your VehicleController’s Update method:
if (Input.GetAxis("Vertical") > 0)
{
    GetComponent<Rigidbody>().AddRelativeForce(100, 0, 0);
}
Now, on every frame, if the player presses the forward button, 100N of force are applied to the game object this script is attached to, i.e. the hovercraft. Save the file, and run your game to see the hovercraft drive. As you will see, in the current state, the hovercraft drives out of sight of the camera, and there is no way to get it back. First, add the ability to drive backwards analogous to driving forward, i.e. if the “vertical” axis is less than 0, apply a negative force. Next, select your cube in the hierarchy and change its rotation around the y-axis to be -90 degrees. This should cause your hovercraft to drive away from the camera rather than to the side. Of course, in an actual racing game, the camera should follow the hovercraft, rather than staying in a fixed position. There are several ways to achieve this, but the simplest for now is to drag and drop the Main Camera game object in the hierarchy and make it a child object of the cube. As mentioned earlier, game objects move together as they are grouped in the hierarchy. In particular, moving a game object also moves all of its children in the same way. This means if you play the game now, and move the hovercraft, the camera will follow right behind it (this may be a bit hard to see until you get near the edge of the plane). Your camera might be a bit off to the side of the hovercraft, and we would rather have it centered. Select the Main Camera in the hierarchy. A game object’s position, rotation and scale are relative to its parent. This means, if you change the z-coordinate of the camera to 0, it will be exactly centered behind the cube, regardless of where the cube is.
Next, in addition to going forward and backward, we also want to be able to turn. For demonstration purposes, we will use a different input method to control the turning: The position of the mouse on the screen. The idea is, since our hovercraft is centered on the screen, that moving the mouse to the left side of the screen should turn the hovercraft left, and moving the mouse to the right side of the screen should turn it right. The Input class provides the mouse position, while the class Screen can tell us how wide the screen is. Add the following code to the VehicleController’s Update method:
float dx = (Input.mousePosition.x - Screen.width / 2)/200;
if (Mathf.Abs(dx) > 0.01f)
{
    transform.rotation = Quaternion.Euler(0, dx, 0) * transform.rotation;
}
When you start the game now, you can drive around the hovercraft by accelerating and turning. As you might expect from such a vehicle, it will keep moving for a while in whichever direction it is going even while you are turning, allowing you to drift around corners. In the next step we will make the map, that is currently very empty, a bit more interesting by adding some obstacles and seeing how that affects gameplay.
Obstacles
As a first step towards actually having a race-track like level, we will now add some obstactles to the map. Create several more cubes and spread them out across the level. Remember that you can use either the move-tool (hotkey: W), or the inspector to change the cubes’ positions. Since you will end up with many cubes in the scene that will just be called “Cube”, “Cube (1)”, “Cube (2)”, etc. in the hierarchy, you may want to change their names at the top of the inspector. Once you have placed several cubes, play the game, and try hitting them with the hovercraft at different angles and with different speeds, to see what happens. You may find it hard to hit the boxes with the current controls, so you should add sideway-movement by using the “Horizontal” axis, and applying a relative force in z-direction, exactly as for forward/backward movement.
When you hit the boxes, your hovercraft will likely fly off, turning around multiple times, which is usually not very friendly to the camera perspective. While we could desire such behavior, for our game we would actually prefer if the vehicle just stayed on the surface. Select the hovercraft in the hierarchy and navigate to the rigidbody in the inspector. Expand the property “constraints”. Here you can select which position and/or rotation values the physics simulation should not affect. Select the x- and z-axis for “Freeze Rotation”, and try the game again. You should still be able to hit the obstacles, but you should never be sent flying in spirals anymore.
While we desire some form of drifting ability for our vehicle, we don’t have any control over the exact parameters yet. First, we will make our velocity and turn-rate easier to configure. In your VehicleController script,
add two public floats called impulse and turnrate, and use these fields instead of the numeric constants 100 for the force to apply, and 200 as the value to divide the difference between the mouse-position and the center of the screen by (don’t worry that there are no values assigned to these fields). Now, when you select your hovercraft in the hierarchy and navigate to the script in the inspector, you can see these two fields, and change their values there. Unity will show any public field in the inspector, and this allows you to write scripts that can be reused over multiple game objects, each of which requires different parameters very easily. For example, if you write a script to control opponents, and expose a public field for their hitpoints and damage, you can use this script on all opponents, and change the values according to enemy-type easily in the inspector.
Next we want to be able to control the physical properties of the objects. In your project, create a folder PhysicsMaterials, and open it. Right click and select “Create” - “Physics Material”, to create a physics material to be used for the car, and give it an appropriate name. With a physics material you can define the friction a material experiences, as well as if and how it will bounce when it hits another object. Set dynamic friction (friction the object experiences while it is moving) to 3 and static friction (the friction the object experiences while it is stationary) to 0.9, and try the game. The hovercraft should now behave significantly different, and stop much more quickly due to the higher friction value. Now, while the game is running, select the hovercraft in the hierarchy, and change the values for impulse (try something like 20), and turn rate (e.g. 500). When you click back into the scene view you can resume playing and Unity will automatically use the changed values. You can also select the physics material from the project and change the friction values. Play with the values until you feel like the hovercraft drives reasonably well, and remember the values you used. When you quit the game, the values you set on the game object will reset to their original values, so change impulse and turn rate to the values you remembered. Note, however, that changes you made to the physics material did not reset, because it is part of the project, not part of the scene.
Now that our hovercraft drives reasonably well, we should add checkpoints to form a race track.
Checkpoints
Let’s start by creating a first checkpoint. Create an empty game object using the menu “Game Object” - “Create Empty”. Then add three cubes as children, with two acting as the poles at the sides, and one in the center, like this:
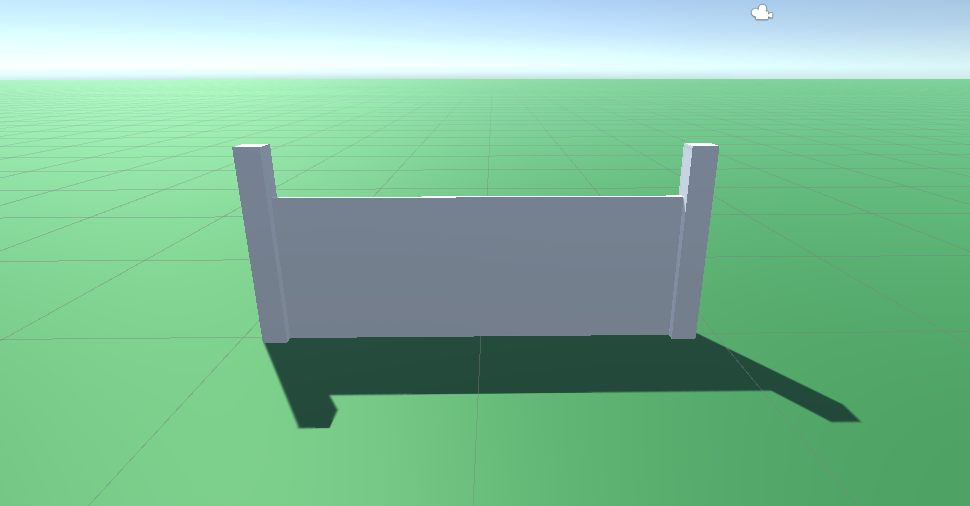
The poles measure 1 by 8 by 1 units, while the central box measures 16 by 6 by 0.2. The idea is that the player has to pass between the two poles, but of course right now we have another box “in the way” that the player will collide with (you can verify this by trying the game). To change this, select this center box in the hierarchy, navigate to the Box Collider in the hierarchy, and check the “Is Trigger” checkbox. A trigger is a game object that will still cause collision events, but will not actually stop other objects’ movement. Add a new script to this same box called CheckpointController and open it in Visual Studio. Add a method OnTriggerEnter to the class:
private void OnTriggerEnter(Collider other)
{
    Debug.Log("trigger enter " + other.transform.name);
}
Debug.Log (and other methods in the Debug class) allows you to write information to the Unity console, which can be very useful for debugging. Additionally, there are methods that allow you to draw rays and lines in the scene view, which may also come in useful when you develop your project. If you have not noticed the Unity console yet, you can find it as a second tab in the project view. Open the console and play the game. You should be able to pass right through the checkpoint, and a message should be shown in the log. Because we don’t actually need (or want) to see the center box of the checkpoint, we can select it in the hierarchy, and deactivate its Mesh Renderer using the checkbox next to the component. You will still get events from the checkpoint, but it is simply not shown in the scene. This technique of having hidden trigger components can be very useful to let events happen when the player (or other characters) reaches a certain part of a level.
Now it is time to create an actual sequence of checkpoints that form our track. We will store the track as a linked list of checkpoints, by adding a public member next of type CheckpointController to the CheckpointController. Additionally, we add a public member target of type CheckpointController to the VehicleController. This target tells us which checkpoint the player should go through next, and the next member of the checkpoint tells us where they then have to go. Additionally, add two public members left and right of type MeshRenderer to the CheckpointController. We will use these two members to refer to the left and right pole of the checkpoint in order to change their colors as a visual indicator for where the player has to go. When you select the center box of the checkpoint, you should see these fields editable in the inspector. Assign the two poles to them by clicking on the little circle to the right of them and selecting the appropriate game objects from the window that opens (this is where it particularly pays off to give game objects reasonable names). Alternatively, you can also drag- and drop the pole game objects from the scene hierarchy to the inspector.
Now copy and paste the entire check point game object (i.e. the empty root game object that has the three boxes as children) 6-8 times and arrange the copies in a circular fashion to create a simple track. The rotate tool (hotkey: E) might be useful to rotate the checkpoints easily in the scene view. Your result should look somewhat like this:
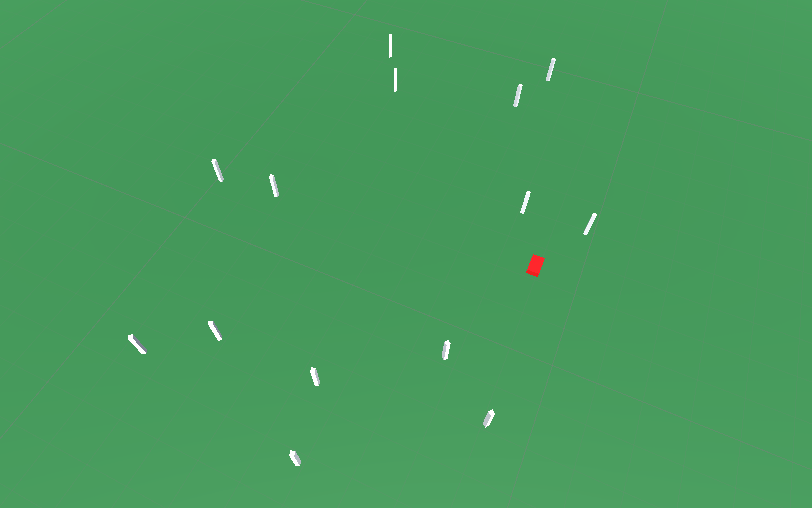
If you look at the individual checkpoints, and in particular the trigger box with the script, the game objects assigned to the left and right properties are automatically set to the correct copies. You can verify this by clicking on the property value in the inspector, which should highlight the corresponding game object in the hierarchy. Now go through each check point in order and assign the respective next checkpoint in the circle to the next property. For the last checkpoint you should set the next property to the first checkpoint (i.e. the track forms a closed loop). Additionally, in the vehicle controller set the first checkpoint as the value of the target property. Now we need to add code to update this target when the player encounters a checkpoint.
Open the CheckpointController script again, and remove the debug code from OnTriggerEnter. Instead, we want to access the vehicle that is passing through the checkpoint:
VehicleController vehicle = other.gameObject.GetComponent<VehicleController>();
if (vehicle != null)
{

}
This ensures that the other game object actually is a vehicle (what if we add something like red shells later?), and gives us access to that game object. Now we need to check if the checkpoint for which this OnTriggerEnter method is called is the current target of the car, and if it is update the target to the next checkpoint (exact code left as an exercise). Additionally, we can use this code to change the color of the next checkpoint to red (and reset the current one back to white):
next.left.materials[0].color = Color.red;
next.right.materials[0].color = Color.red;
left.materials[0].color = Color.white;
right.materials[0].color = Color.white;
Note that when you play the game now, you can pass through the checkpoints and the next checkpoint will be colored red. The only problem is that the first checkpoint will not be colored red, because we only change colors when a checkpoint is actually encountered. To fix this problem, add the following two lines to the VehicleController’s Start method, which will be called at the beginning of the game.
target.left.materials[0].color = Color.red;
target.right.materials[0].color = Color.red;
You can now create arbitrary race tracks on the plane by adding more and more checkpoints, and connecting them properly using the next property. As a next step, we will add a very basic UI to the game to display the race time.
A User Interface
Use the menu “Game Object” - “UI” - “Text” to create a text UI element. You will see that Unity also automatically creates a “Canvas” in the hierarchy in which it places the text. This is because the UI elements live in a different space than the rest of the level. In particular, we don’t want our UI elements to move out of the camera as the hovercraft moves around. Instead, the canvas will always place the UI elements directly on the screen in the coordinates that we put them. Double click the canvas to zoom to it in the scene view, and move the text element to the top right. Next, open the VehicleController script and add a member starttime of type float. Additionally, we want to add a public member to store our UI element, but for this we first need to add using Unity.UI to the top of the file. Then add timelbl as a public member of type Text. In Start assign Time.time to starttime. Then, in Update, we can compute the current race time as Time.time - starttime. You can assign text to the label like this:
timelbl.text = string.Format("Current time: {0:F2} seconds", (Time.time - starttime));
Don’t forget to assign the Text element to the timelbl property of the hovercraft before you try the game. You should now see the current time in the race. We could now polish this game, by adding a property to indicate which checkpoint is the first in a lap, performing special actions when that one is encountered (such as counting laps driven, resetting the time, etc.), adding more UI elements to display the speed, the current lap, or simply make a more interesting race track. Alternatively, we can make the game prettier by adding more elaborate art assets, which is what will be briefly described in the next section.
Better Art Assets (optional)
If you click the tab “Asset Store”, you can search for better art assets for the game. For example, if you enter “hovercraft” and select “Free Assets” from the options on the right, one option is “Dieselpunk Hovercraft 01 PBR”. When you download this asset and import it into your project, you will find a whole directory with different files, including a demo scene, textures, as well as a ready-to-use 3D model under DP_02\Prefabs (Prefabs in Unity are kind of like object blueprints. We will hear more about them next week). Rather than replacing the hovercraft as we have it, we can use this 3D model and place it as a child of the existing cube. Change the scaling so that it aligns well with the hovercraft, and then deactivate the mesh renderer for the original cube. This way, the collision detection is still done on the cube rather than the more complex (and thus more computationally expensive to test) full 3D model, but the user will see the nice hovercraft instead of just a block. Additionally, this makes it easy to replace the 3D model with a different one in the future, while all gameplay features can continue using the cube. For your projects I recommend a similar approach, using placeholder structures like cubes or circles, and adding nicer graphics if/when you have the time.
Landscape (optional)
Just having a plane as the landscape is a bit boring. Luckily, Unity provides a “Terrain” game object, in which we can use brushes to “draw” mountains, hills, canyons, etc. and then also put textures on the different parts of the level. If you want to know more about how to do this, check out this tutorial.
Further Information
You can find a completed version of this tutorial, with some extra features, on github. You can also try a more advanced version of Hoverrace by downloading it from here
Some Frequent Pitfalls
-
Don’t forget to save your scripts before playing the game
-
If you make any changes to game objects in the scene in the inspector while the game is running, these changes will be discarded when you stop the game.
-
Unity using floating point numbers for positions, rotations, scale. You have to append an f to numeric literals, or your code will not compile (e.g. you have to write
0.1finstead of just0.1) -
Make your members public so you can edit them in the inspector. For development this can be useful even for values you do not want to change from the scene view, because the inspector updates live while you play the game.